


|
 The Developer's Resource & Community Site |
| COM | XML | ASP | Java & Misc. | NEW: VS.NET |
| International | This Week | Forums | Author Central | Find a Job |
WTL Architecture
Author: Richard Grimes
Date Submitted: Feb 02 2000
Level of Difficulty: Intermediate
Subjects Covered: WTL applications architecture, WTL UI update, OutputDebugString and debugging API
Pre-required Reading: assumes a knowledge of ATL and of Win32 application development (for example "Professional ATL COM Programming", Richard Grimes, Wrox Press)
Download 'Debuginfo.zip' here (60kb).
Introduction:
WTL has finally arrived, and it certainly provides the features that I hoped it would. To get a list of the features in WTL take a look at the WTL Bytesize article . In this article I will describe WTL's architecture and I will give some sample code that illustrates how to use WTL's features and I hope it will also be a useful utility for you.
WTL Application Types
WTL provides several application types, which you can select from the first AppWizard page:
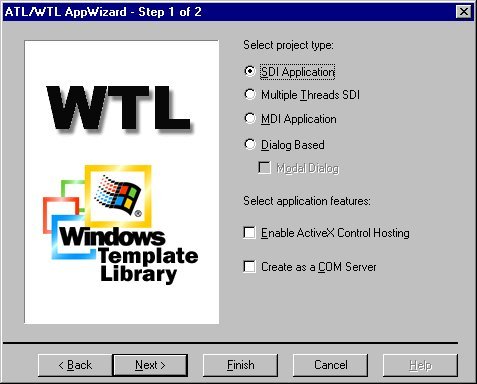
These application types are shown in the following table. In part, this flexibility defines its architecture.
|
Application Type |
Description |
|
SDI Application |
Single document interface - there is a single window |
|
Multiple Threads SDI |
A single process can have more than one window |
|
MDI Application |
Multiple document interface - within the frame window you can have zero or more child windows |
|
Dialog Based |
The process is based on a dialog template |
The Multiple Threads SDI application type may be new to you, but the concept is quite simple. When you start the process it will have a single window, showing a single document. However, if you ask the application to create another document there is a problem because it is SDI and so can only show one document. To get round this problem then this application type will create another SDI window. This will look as if another instance of the application is running, but this is not the case because the original process merely creates a new window attached to a new thread. This is the behaviour that you see with Internet Explorer when you select New Window from the File menu and it is done to conserve system resources.
For each of these application types (except for Multiple Threads SDI) the process can be a COM server and the AppWizard gives you this as an option. In addition, you can use the AppWizard for any of these application types to specify that it can host ActiveX controls. If you select this option for dialog applications then you will find that you need to select the "Host ActiveX Controls" on the next page. Indeed, only this option will be enabled in this case, and it will only be enabled for dialog based applications which makes me wonder why it was not put on the first page.
The other options on the second page are enabled for all the other application types and it allows you to specify whether the application has a toolbar, a status bar or a view window.

If you select the toolbar option then you can choose whether to base it on a Internet Explorer rebar control. If you do, then you can access it via the m_hWndToolBar frame window member (described later) and use this to add additional toolbars if you wish. Selecting this option also gives you the choice of having a command bar. This is like the CE command bar control, except that WTL implements it as a class, whereas on CE the command bar is a system windows class. Command bars are useful because they allow you to add windows other than buttons to a toolbar. If you choose this option then both the toolbar and the menu will be implemented as toolbars. This allows the menu items on the menus to have associated icons and you have the menu items highlighted as you move the mouse over the menu. Menus like this have been available on Office Applications since Office 97.
You also have the option of specifying whether the application uses a view class (which in most cases you will want) and how this view class is implemented. The options are given in the next table.
|
View Option |
Description |
|
Generic Window |
A simple window. Use this for documents that should be 'painted' because it allows you to write a WM_PAINT handler |
|
Form |
This has a dialog template which you should use for windows and ActiveX controls. Your application is used to 'script' these controls |
|
List Box |
The view is a list box, which in its simplest form means adding strings by calling its AddString() method |
|
Edit |
The view is an edit control. Essentially this gives you an application like Notepad. |
|
List View |
The view is a list view common control. Use this control to show items that are related (for example, control panel is a list view hosted in Explorer, the items here are related because they are all control panel applets). |
|
Tree View |
The view is a tree view common control. Use this for data that is related in a hierarchical fashion, for example you could use it to show the schema of a database with top level branches for the tables and stored procedures, and a second level of branches for fields in the tables |
|
Rich Edit |
The view is a rich edit control which gives you an application like WordPad. |
|
HTML Page |
This hosts the IE Web Browser control. It allows you to host a web page as the view. |
The example for this article will use a dialog template, but needs a menu, so the Form view type is ideal.
Application Threads
Like ATL, each WTL needs a _Module global variable to hold global data and give access to application level code. In WTL this variable is an instance of either CAppModule or CServerAppModule, the latter is used if the application is also a COM server. Every application will have one or more UI threads and WTL manages this in two ways. If the application runs just one UI thread (which is the default case for all the application types except the Multiple Threads SDI) then the thread will run the global method called Run():
int Run(LPTSTR /*lpstrCmdLine*/ = NULL, int nCmdShow = SW_SHOWDEFAULT)
{
   CMessageLoop theLoop;
   _Module.AddMessageLoop(&theLoop);
   CMainFrame wndMain;
   if (wndMain.CreateEx() == NULL)
   {
      ATLTRACE(_T("Main window creation failed!\n"));
      return 0;
   }
   wndMain.ShowWindow(nCmdShow);
   int nRet = theLoop.Run();
   _Module.RemoveMessageLoop();
   return nRet;
}
This creates an instance of CMessageLoop which contains the message loop for the thread, these are held in the global message loop map indexed by the thread's ID so that other code running in the thread can have access. The message loop object contains the message filters and idle handlers, so for example a UI element running in this UI thread will be able to add its own idle handler which is run if there are no messages in the thread message queue. The main message map lives in CMessageLoop::Run() which looks a bit like this pseudocode:
MSG m_msg;
int CMessageLoop::Run()
{
   for (;;)
   {
      while (!::PeekMessage(&m_msg, NULL, 0, 0, PM_NOREMOVE))
         DoIdleHandlers();
      bRet = ::GetMessage(&m_msg, NULL, 0, 0);
      if(bRet == -1)
         continue;
      else if(!bRet)
         break;
      if (!DoMessageFilters(&m_msg))
      {
         ::TranslateMessage(&m_msg);
         ::DispatchMessage(&m_msg);
      }
   }
   return (int)m_msg.wParam;
}
As you can see, this pumps the message queue, and if there is no message then all the idle handlers registered for this thread are run. If a message is detected in the queue it is obtained and then passed to each of the message filters; if none of these handles the message then it is dispatched to the target window in the normal fashion.
If your application has more than one UI thread then you can use the WTL thread manager, which is the case with the Multiple Thread SDI applications. In this case you have one thread – the main thread – that runs as the manager thread. This thread will create a new thread for each new window that is created. The main thread routine looks like this:
int nRet = m_dwCount;
DWORD dwRet;
while(m_dwCount > 0)
{
   dwRet = ::MsgWaitForMultipleObjects(m_dwCount, m_arrThreadHandles,
   		FALSE, INFINITE, QS_ALLINPUT);
   if(dwRet >= WAIT_OBJECT_0 && dwRet <= (WAIT_OBJECT_0 + m_dwCount - 1))
      RemoveThread(dwRet - WAIT_OBJECT_0);
   else if(dwRet == (WAIT_OBJECT_0 + m_dwCount))
   {
      ::GetMessage(&msg, NULL, 0, 0);
      if(msg.message == WM_USER)
         AddThread(_T(""), SW_SHOWNORMAL);
   }
}
The thread handles are held in an array and are added by calling AddThread() (which will also start the thread) and removed by calling RemoveThread(). The wait statement breaks on one of two occasions: if a thread dies (in which case the handle becomes signalled and so the routine just removes the thread handle from the array) or if the thread receives the WM_USER message (which another thread posts to create another window in a new thread). The thread manager is a class in your application, so you can add your own message handlers in this loop, for example if you have more than one window type. Creating a new window is as simple as calling this from another window:
::PostThreadMessage(_Module.m_dwMainThreadID, WM_USER, 0, 0L);
This loop will continue to run until all the UI threads have shut down. These UI threads have a thread procedure that is essentially the same as the Run() method for single UI-threaded WTL applications. However, the thread manager's use of MsgWaitForMultipleObjects() means that you can have a maximum of MAXIMUM_WAIT_OBJECTS-1 UI threads which means a maximum of 63 windows.
Frames
WTL windows are actually two windows: a frame and a view. As the name suggests, the frame window supplies the caption bar and frame for a window and your code uses this to handle tool bar and menu item command messages. The actual image that you see in the application's window is produced by the view window, in essence the view covers the client area of the frame that is not covered by adornments like the status bar and tool bars.
The thread routine will create an instance of the main frame window and it is the responsibility of this window's WM_CREATE handler to create the view. For SDI applications this is as simple as having an instance of the view class as a class member and calling the view's Create() method. MDI applications are slightly different in that the MDI frame window creates a window from a class called the MDICLIENT through the WTL method CMDIFrameWindowImpl<>:: CreateMDIClient() and this client window has CMDIChildWindowImpl<> windows as children, each of which has a view. This reflects the fact that MDI applications can have zero or more child windows, each with a frame and caption bar.
The frame window's OnCreate() is interesting, so let's take a look at it:
LRESULT OnCreate(UINT, WPARAM, LPARAM, BOOL&)
{
   // create command bar window
   HWND hWndCmdBar = m_CmdBar.Create(m_hWnd, rcDefault,
   	NULL, ATL_SIMPLE_CMDBAR_PANE_STYLE);
   // attach menu
   m_CmdBar.AttachMenu(GetMenu());
   // load command bar images
   m_CmdBar.LoadImages(IDR_MAINFRAME);
   // remove old menu
   SetMenu(NULL);
   HWND hWndToolBar = CreateSimpleToolBarCtrl(m_hWnd, IDR_MAINFRAME,
   	FALSE, ATL_SIMPLE_TOOLBAR_PANE_STYLE);
   CreateSimpleReBar(ATL_SIMPLE_REBAR_NOBORDER_STYLE);
   AddSimpleReBarBand(hWndCmdBar);
   AddSimpleReBarBand(hWndToolBar, NULL, TRUE);
   CreateSimpleStatusBar();
   m_hWndClient = m_view.Create(m_hWnd, rcDefault, NULL,
   	WS_CHILD | WS_VISIBLE | WS_CLIPSIBLINGS | WS_CLIPCHILDREN,
	WS_EX_CLIENTEDGE);
   UIAddToolBar(hWndToolBar);
   UISetCheck(ID_VIEW_TOOLBAR, 1);
   UISetCheck(ID_VIEW_STATUS_BAR, 1);
   CMessageLoop* pLoop = _Module.GetMessageLoop();
   pLoop->AddMessageFilter(this);
   pLoop->AddIdleHandler(this);
   return 0;
}
This is taken from an SDI application that has a command bar-based tool bar and a status bar. The first line of the method creates the command bar and then it is initialized with the frame window's menu and the toolbar bitmap. This code takes the menu and converts all pull down menus into toolbar buttons and stores the menu in an instance variable for later use. In effect the menu is implemented by a toolbar – let's call this the menu toolbar. The code then loads the individual images of the application's toolbar into an image list and stores their IDs in array. When the menu toolbar buttons are clicked the commandbar code accesses the appropriate sub menu and creates a popup menu. When it does this it compares the command IDs of the sub menu items with the IDs it stored that are associated with the toolbar button images in the image list, and if the comparison succeeds then it adds the associated image to the menu item. This means that menu items and toolbar buttons that have the same IDs will have the same images.
Next, the code creates the toolbar and associates it with the commandbar before creating the status bar and the view. As you can see the view HWND is stored in the frame window in m_hWndClient. This window handle is used in the frame window's WM_SIZE handler, so that when the frame window is resized the view is told to resize itself taking the status bar and command bar into account.
The next three lines (starting with the call to UIAddToolBar()) are used to indicate the UI items that can have their status changed at runtime, I'll come back to this later in this article. Finally, the code accesses the message loop, which as you'll remember was saved in a global array, GetMessageLoop() obtains the message loop for the current thread, this is used to add the message filter and idle handler for the frame window, which by default are called PreTranslateMessage() and OnIdle().
Frame windows derive from the following classes:
class CMainFrame :
   public CFrameWindowImpl<CMainFrame>,
   public CUpdateUI<CMainFrame>,
   public CMessageFilter,
   public CIdleHandler
The last two are abstract classes that declare that the frame window implements PreTranslateMessage() and OnIdle(). Deriving from CUpdateUI<> means that the frame class supports a UI update map.
Views
The view window is quite simple:
class CMyView : public CWindowImpl<CMyView>
{
public:
   DECLARE_WND_CLASS(NULL)
   BOOL PreTranslateMessage(MSG* pMsg)
   {
      pMsg;
      return FALSE;
   }
   BEGIN_MSG_MAP(CMyView)
      MESSAGE_HANDLER(WM_PAINT, OnPaint)
   END_MSG_MAP()
   LRESULT OnPaint(UINT, WPARAM, LPARAM, BOOL&)
   {
      CPaintDC dc(m_hWnd);
      //TODO: Add your drawing code here
      return 0;
   }
};
This is the view class for an SDI application. Multiple Threads SDI and MDI view classes are essentially the same, but they do not have the PreTranslateMessage() method which is used by SDI applications to catch messages before the frame can handle them. The implementation of PreTranslateMessage() in the SDI frame just forwards messages to the view.
A view class like the one shown here does very little. You should add to the OnPaint() handler the code to draw your document image. If you support input like mouse clicks or keyboard presses then the appropriate message handlers should be added to this class and map. As you can see this window derives from CWindowImpl<>, however, if you would like it to be based on a Win32 control then you should derive from one of the WTL classes in AtlCtrls.h.
If you would like scroll bars on your CWindowImpl<>-based class then you should replace the base class with CScrollWindowImpl<> and chain messages to it:
class CMyView : public CScrollWindowImpl<CMyView>
{
public:
   typedef CScrollWindowImpl<CMyView> parent;
   BEGIN_MSG_MAP(CMyView)
      CHAIN_MSG_MAP(parent)
   END_MSG_MAP()
   void DoPaint(CDCHandle dc)
   {
   }
This base class will ensure that the window has scroll bars and provides default handlers for the scroll bar messages. The view class no longer has a WM_PAINT handler because this is implemented by CScrollWindowImpl<> to draw the appropriate part of the view depending on the scroll bar positions. Instead, your class implements a DoPaint() method to paint the entire view. If you want to specify scroll ranges, sizes or a start position in the view then you should add a WM_CREATE handler and put this code there.
As I mentioned earlier, the frame window will resize the view window to fill the remaining part of its client area not covered by the status bar or toolbar. This is fine in most cases, but what happens if you want to produce an effect like Windows Explorer with a window that contains a tree view and a list view and a splitter bar between the two? In WTL the solution is simple: use a splitter window!
To do this you need to change the frame window so that it creates an instance of a splitter window as the view. For example, if you have the following data members in your class:
CSplitterWindow m_view;
CTreeViewCtrl m_tree;
CListViewCtrl m_list;
You can create the splitter window in OnCreate() with the following:
// get the frame client rect, so that we set the splitter initial size
// and we can get the splitter bar in the centre
RECT rect;
GetClientRect(&rect);
m_hWndClient = m_view.Create(m_hWnd, rect,
	NULL, WS_CHILD | WS_VISIBLE);
m_tree.Create(m_view, rcDefault, NULL,
	WS_CHILD | WS_VISIBLE | TVS_HASBUTTONS | TVS_HASLINES | TVS_LINESATROOT,
	WS_EX_CLIENTEDGE);
m_list.Create(m_view, rcDefault,
	NULL, WS_CHILD | WS_VISIBLE | LVS_REPORT, WS_EX_CLIENTEDGE);
m_view.SetSplitterPanes(m_tree, m_list);
m_view.SetSplitterPos();
The splitter window is created as the view with the frame window as its parent. In this code I pass the actual size of the frame window client area. I could use rcDefault here because the frame window will forward a WM_SIZE message to the splitter once the frame window has been completely created and so the splitter will resize itself to fill the frame. However, the problem with this approach is that I call SetSplitterPos() with no parameters to indicate that the splitter bar should be positioned in the centre. The splitter uses its size to determine where its centre is and since rcDefault effectively tells the window that its size is zero it means that the splitter bar will be positioned at the left hand side hiding the left window!
After creating the splitter you should then create the windows that you want split. These windows should be created as child windows with the splitter as their parent. Finally you can add these child windows to the splitter with SetSplitterPanes() and determine the position of the splitter bar.
UI Update
Menu items can be enabled or disabled, and they can have check marks or a group can behave like radio buttons in that only one should have a check mark against it. Furthermore, menu items have images and text. All of this state could change at runtime based on some value in the application. Toolbars, to a certain extent, are a more visible form of a menu because their buttons may be enabled or disabled, they can be pushed in or out, either individually or as part of a group. The UI update mechanism allows you to identify the UI elements whose state can change at runtime. WTL does this using the UI update map:
BEGIN_UPDATE_UI_MAP(CMainFrame)
   UPDATE_ELEMENT(ID_FILE_SAVERESULTS, UPDUI_MENUPOPUP | UPDUI_TOOLBAR)
   UPDATE_ELEMENT(ID_VIEW_TOOLBAR, UPDUI_MENUPOPUP)
   UPDATE_ELEMENT(ID_VIEW_STATUS_BAR, UPDUI_MENUPOPUP)
END_UPDATE_UI_MAP()
This example indicates that the three menu items have a state that should be shown at runtime and one of these, ID_FILE_SAVERESULTS, has a toolbar button associated with it. All this does is create an array with this information. There are two other aspects that you need to address. The first is the state of the UI element. If the element is a menu item then you can call UIEnable() to enable or disable it, UISetCheck() to determine if the item has a check mark against it and UISetText() to change the menu text. On the other hand, if the element is a toolbar button then you can call UIEnable() to enable or disable it and UISetCheck() or UISetRadio() to determine if the button is pushed in or out.
Thus you can have code like this to disable or enable the cut menu items and toolbar buttons if there is no text selected:
BOOL bSelected = GetSelected();
UIEnable(ID_EDIT_CUT, bSelected);
You can put such text in appropriate handlers (for example if one menu item depends on an action selected by an item on another menu), or put it in the OnIdle() method and check some class level variable.
The other issue is to make sure that the various UI elements are updated, and to do this you have to make a call to one of the CUpdateUI<> methods to add the element. The main menu is automatically added, but any additional menus and all the toolbars that you use have to be added to the list of UI elements and to do this you call UIAddMenuBar() and UIAddToolBar() respectively.
There are a couple of other things to watch out for. Firstly, make sure that after setting the state to ensure that the toolbar is updated you have to call UIUpdateToolBar(). You do not have to do this for menus because sub menus are generated on the fly when the menu items are selected. There is a method called UIUpdateMenuBar() but this resets the menu to the state of the HMENU that it is created from, which is not what you want if you change the text of some items (because they will be changed back to their previous text).
Although there is a method call UISetRadio() there is no mechanism to treat several menu items or toolbar buttons as a radio button group (that is, there must be one and only one selected) if you want this behaviour you must code it yourself, which is simple to do.
Dialogs
ATL has always had good support for dialogs, and to this WTL adds wrapper classes for common dialogs. Essentially, these add validation and callbacks for the dialog. For example, if you want to handle the occasion when the user changes a folder in an Open dialog then you should derive from CFileDialogImpl and implement OnFolderChange(), for example
class CMyFileDialog : public CFileDialogImpl<CMyFileDialog>
{
public:
   CMyFileDialog(BOOL b)
      : CFileDialogImpl<CMyFileDialog>(b) { }
   void OnFolderChange(LPOFNOTIFY lpon)
   {
      char strFolder[MAX_PATH];
      if (GetFolderPath(strFolder, sizeof(strFolder)) > 0)
      {
         MessageBox(strFolder);
      }
   }
};
When the folder path changes CFileDialogImpl<> calls your OnFolderChange(), which in turn calls GetFolderPath() on the base class to see what the new path is.
Controls
WTL provides wrapper classes for all of the Win32 and common control types, including the new ones introduced in Windows 2000. These classes are thin wrappers, but they make accessing these controls much easier. For example, can you remember the name of a message to send to a list view to get the text of the currently selected item and the parameters you should pass? (In fact, you need to send two messages, one to get the index of the selected item and another to get its text.) The WTL authors have done all the grunge work of determining the message that should be sent and provided simple wrapper methods.
You can use the control classes in two ways. If you have a dialog with a control on it, you can attach the control's HWND to a wrapper object and use the wrapper class's methods to access the control. This allows you to provide simple scripting code to read and write data to controls and to handle notification messages from them.
The other way that you can use these classes is to include the wrapper class in your view's class hierarchy:
class CMyView
   : public CWindowImpl<CMyView, CListBox>
This means that the CWindowImpl<> base class will derive from CListBox and hence the window that is created will be a list box (because CListBox::GetWndClassName() is called to get the class name). In addition, the ATL windowing mechanism will subclass this window to route messages sent to it to your message map, it retains the old window procedure so that if you do not handle these messages they will be handled by the old procedure. WTL uses this technique when you indicate that your view is based on a control.
While I am on the subject of notification messages and subclassing it is worth pointing out that most windows controls will send notification messages to their parent when something interesting happens. It is far better to get your window to handle these notification messages rather than subclassing an existing control window (or superclassing an existing class and creating an instance) to get the message before the control does. For example, if you want to handle a click on a child button then all you need to do is handle the BN_CLICKED notification which will be sent to your class. The alternative is superclassing the BUTTON window through CContainedWindow<> and handle the click message in an alternative message map.
I say this because one well known ATL speaker (who really should know better) passed some code to me that did just this – his code for accessing a simple button click was 3 or 4 times longer than because he superclassed the buttons rather than simply handling the BN_CLICKED notification.
WTL also provides some new controls that do not have Win32 equivalents. You have already seen one, the command bar, but in addition there are other classes that do useful things:
|
Class |
Description |
|
CBitmapButton |
This is a button that has a bitmap instead of a caption. You can provide an image list with images for the button in its normal state, when disabled, when pushed and when the mouse hovers over it. |
|
CHyperLink |
Allows you to create a static control that represents a hyperlink so that when the user clicks on it the default web browser is used to navigate to the link. |
|
CWaitCursor |
This merely changes the cursor to a wait cursor in its constructor and back to the original cursor in its destructor. |
|
CCheckListViewCtrl |
A list box which has check boxes next to each item |
|
CMultiPaneStatusBarCtrl |
A status bar with multiple panes |
The DebugInfo Example
The example code for this article monitors two sources of debug messages. It is based on the SDI application type because I want to use a toolbar and a menu (you can have a menu on a dialog based application, but you have to take this into account when resizing the controls on the dialog when the dialog is resized). I want to place information about the debug messages and their source into Win32 controls and so I have decided that it is easier to place these on a dialog template and get Windows to create them when the dialog is created rather than having to create the controls as child windows of another window.
With these two criteria in mind it appears to be better to use a form view. I have decided to allow the process to have a resizable window, so it must manage this by repositioning and resizing the controls.
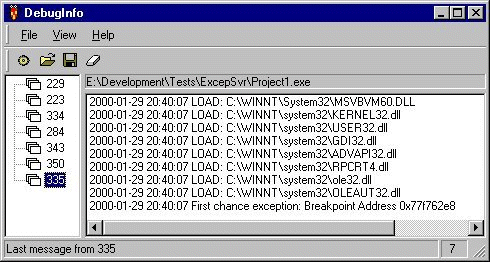
The screenshot shows a typical run. The left hand control is a tree view that has a entry for all of the processes that have generated a debug message. On the right hand side is a static control with either the name or the PID of the selected tree view item. The debug messages of this process are shown in the list box on the right hand side. The status bar shows two panes - the left hand pane tells you which process generated the last message, while the right pane has the number of items in the list view.
The tool bar buttons, from left to right, allow you to indicate a process from which you want to view the debugging messages, open saved results, save results and finally to clear the controls. These buttons have corresponding items on the File menu and View menu. The Clear All button will clear all of the controls and shut down the threads used to gather the debug messages.
When you resize this window the width of the tree view is always preserved, but the size and position of the other controls are changed according to the requested size.
Debugging Messages
The first source of debug messages is the output debug stream and these messages are usually generated when a process calls OutputDebugString(), this is what ATLTRACE() does. These messages are available through a memory mapped file called DBWIN_BUFFER and access to this is managed through two events called DBWIN_BUFFER_READY and DBWIN_DATA_READY. The data in the memory mapped file is a string prefixed with the process ID of the process that generates the string. The code to access this memory mapped file is in a static method in the view class (CDebugInfoView) called PollDebugStream() and is essentially a copy of the code from the DBMon Platform SDK example (msdn.microsoft.com/library/devprods/vs6/visualc/vcsample/vcsmpdbmon.htm).
The other source of debug messages are the debug events generated by the system when a process is being debugged, which also includes OutputDebugString() messages generated by that process. There are two ways that you can get these events: you can start a process and indicate that the current thread will attach to it as a debugger, or you can attach a thread to a running process. DebugInfo fully supports the first and partially supports the second. It will attach to a process when it has been started with a command line switch that gives the process ID of the process to attach to. If you register DebugInfo as the system debugger (through the AeDebug key, see support.microsoft.com/support/kb/articles/Q103/8/61.asp) then the system will use DebugInfo when some exceptional event occurs. Such occasions are when an uncaught exception occurs in a process or if a user on another machine attempts to step into a method of a remote COM server running on a machine where DebugInfo is registered as the system debugger and JIT and OLE RPC debugging are enabled. In both of these cases the system will pass the process ID and the handle of an event object. Once your debugger has attached to the process you should set this event to inform the system. For full details of these switches see the DrWatson source in the Platform SDK.
To accept the debug events the debugging thread calls WaitForDebugEvent() which returns when an event occurs (or it times out) and the thread will receive a DEBUG_EVENT structure that indicates what sort of event occurred and parameters specific to that event. The code for this is in a static method of the view class called PollDebuggerEvents().
DebugInfo
creates a thread to monitor the debug stream and a thread for every process that it is a debugger for. This is the reason why PollDebugStream() and PollDebuggerEvents() are static methods since it ensures that these methods are __stdcall and not __thiscall. So that these methods can have access to instance variables they use the common mechanism of passing the view's this pointer in the thread procedure's LPVOID parameter. Using many worker threads like this does present problems.The first problem is that there must be some way to get debug messages into the controls, this is a problem because the dialog box windows procedure is a different thread to the worker threads. The best way to do this is to post a private message (WM_NEWDATA) to the dialog and pass a buffer with the information to log. I post this message rather then sending it because SendMessage() blocks until the message is handled, PostMessage() merely puts the message in the target message queue and then returns to allow the source thread to continue its work. The code that does this creates the buffer with the C++ new operator but does not delete it. The reason is that we do not want the source thread deleting the buffer before the target thread uses it, thus the handler for the WM_NEWDATA message has the responsibility of deleting this buffer when it has finished with it.
The other problem is that I have to make sure that all these worker threads are shut down when DebugInfo closes down. So whenever I create a thread I put information about it into a vector in the view class. To shut down these threads I create an event object and each of the worker threads waits periodically on this event to see if it has been set. If it has been set then the thread takes this as an indication that it should die. The code that sets the event waits on the handles of the threads obtained from the vector so that no more processing should occur until those threads have gone away.
This thread vector is held in the view object (because it holds data that is pertinent to the view). The close handler looks like this
LRESULT CDebugInfoView::OnClose()
{
   m_whileDieing = true;
   SetEvent(m_hDie);
   // wait for the debug stream thread to go away
   // use this loop to allow the UI to update
   while (MsgWaitForMultipleObjects(1, &m_hThread, FALSE, INFINITE,
   	QS_ALLEVENTS) != WAIT_OBJECT_0)
   {
      MSG msg;
      while (PeekMessage(&msg, this->m_hWnd, 0, 0, PM_REMOVE))
      {
         TranslateMessage(&msg);
         DispatchMessage(&msg);
      }
   }
   CloseHandle(m_hThread);
   KillDebugThreads();
   CloseHandle(m_hDie);
   m_whileDieing = false;
   ClearControls();
   return 0;
}
The current thread is a UI thread, so it is dangerous to call WaitForSingleObject() because this will block the pumping of the message queue. Of course this does not matter much in this handler because the process is about to go away, but even so I have decided to allow messages sent to this window to be handled. One situation where this is an important consideration is if one of the threads has sent a WM_NEWDATA message before being told to die, because if this is not handled then the buffer will be leaked.
The KillDebugThreads() is used to monitor the closing down of the threads that are monitoring debug events from processes. These threads will already know that they should die (because the event has been set), but we must wait for them to die before cleaning up their resources:
void CDebugInfoView::KillDebugThreads()
{
   m_threadArrayCS.Lock();
   if (m_hDebugThreads.size() > 0)
   {
      HANDLE pThreads[MAXIMUM_WAIT_OBJECTS-1];
      DWORD dwSize = m_hDebugThreads.size();
      if (dwSize > MAXIMUM_WAIT_OBJECTS-1)
         dwSize = MAXIMUM_WAIT_OBJECTS-1;
      DWORD dw;
      for (dw = 0; dw < dwSize; dw++)
      {
         // get the handle out of the vector and remove the value
         std::vector<ThreadData>::iterator it;
         it = m_hDebugThreads.begin();
         ThreadData& td = *it;
         pThreads[dw] = td.hThread;
         m_hDebugThreads.erase(it);
      }
      while (MsgWaitForMultipleObjects(dwSize, pThreads, FALSE, INFINITE,
	  	QS_ALLEVENTS) >= WAIT_OBJECT_0 + dwSize)
      {
         MSG msg;
         while(PeekMessage(&msg, this->m_hWnd, 0, 0, PM_REMOVE))
         {
            TranslateMessage(&msg);
            DispatchMessage(&msg);
         }
      }
      for (dw = 0; dw < dwSize; dw++)
         CloseHandle(pThreads[dw]);
   }
   m_threadArrayCS.Unlock();
}
Notice that the code copies out MAXIMUM_WAIT_OBJECTS-1 threads from the vector of thread data and waits on those. MsgWaitForMultipleObjects() has a limit that only allows it to wait on this number of objects, but since MAXIMUM_WAIT_OBJECTS is 64 I doubt that you'll ever exceed this limit. Just in case you do I do the wait in multiple stages.
Since I allow messages to be handled there is a possibility of the message being a menu (or toolbar) handler to create a new thread to debug a process. To prevent this happening I have added a boolean to the class called m_whileDieing; this is set to true when the thread list is being cleared. The code that creates the debug threads starts with code like this:
void CDebugInfoView::StartProcess(LPCTSTR strFileName)
{
   if (m_whileDieing)
      return;
which prevents the new thread from being created. There is only a small possibility of this happening, and as you can see I have not handled it in the most satisfactory way because the user will have to select the menu item again to start a debugging thread.
Main Frame
The main frame class is fairly straight forward. It has two main tasks, the first is to update the UI elements, which I will talk about in a later section, and the second is to handle menu (and toolbar) selections. Since the view class does all the work, the main frame class merely forwards menu selections to the view, for example when the user wants to clear all the controls it is handled with this:
LRESULT CMainFrame::OnClearAll(WORD, WORD, HWND, BOOL& bHandled)
{
   m_view.SendMessage(WM_COMMAND, MAKEWPARAM(ID_VIEW_CLEARALL, 0), NULL);
   return 0;
}
this merely passes the menu selection to a handler in the view class. The menu handlers for starting processes and loading and saving data are more interesting:
LRESULT CMainFrame::OnStartProcess(WORD, WORD, HWND, BOOL& bHandled)
{
   CFileDialog ofn(TRUE, _T("exe"), NULL,
      OFN_FILEMUSTEXIST | OFN_HIDEREADONLY | OFN_NOCHANGEDIR | OFN_PATHMUSTEXIST,
      _T("Processes\0*.exe\0All Files\0*.*\0"), this->m_hWnd);
   ofn.m_ofn.lpstrTitle = _T("Select the executable to start");
   if (ofn.DoModal() == IDOK)
   {
      m_view.StartProcess(ofn.m_szFileName);
   }
   return 0;
}
This uses one of the WTL common dialog box classes, in this case to show the Open dialog. If the user selects a file then the name is passed to a private method of the view
UI Update
The mainframe has this map:
BEGIN_UPDATE_UI_MAP(CMainFrame)
   UPDATE_ELEMENT(ID_FILE_SAVERESULTS,  UPDUI_MENUPOPUP | UPDUI_TOOLBAR)
   UPDATE_ELEMENT(ID_VIEW_CLEARALL,  UPDUI_MENUPOPUP | UPDUI_TOOLBAR)
   UPDATE_ELEMENT(ID_VIEW_TOOLBAR, UPDUI_MENUPOPUP)
   UPDATE_ELEMENT(ID_VIEW_STATUS_BAR, UPDUI_MENUPOPUP)
END_UPDATE_UI_MAP()
The last two items are added by the wizard and give check marks against the View menu items depending on whether the toolbar or status bar should be shown. The first and second items update the toolbar button and File/View menu items for saving results or clearing results depending on whether there are results in the tree view.
To indicate that UI updating is used the mainframe class calls UIAddToolBar(hWndToolBar) in the OnCreate() handler to indicate that the tool bar should be considered when updating UI elements. By default the main menu will automatically take part in UI updating.
The states of these UI elements are changed in two places, when the user does something to change the UI and in the idle handler. The idle handler calls the following method:
void CMainFrame::UpdateUIAll()
{
   CTreeViewCtrl tv;
   tv = m_view.GetDlgItem(IDC_TREEDATA);
   if (tv == NULL) return;
   UINT count = tv.GetCount();
   UIEnable(ID_FILE_SAVERESULTS, count > 0);
   UIEnable(ID_VIEW_CLEARALL, count > 0);
   UIUpdateToolBar();
}
This accesses the tree view control to see if there are any items, if there are then UIEnable() is called with true, otherwise false is used. This indicates whether the menu item is enabled or not and this state is shown when the menu is pulled down. It also affects the state of the corresponding button on the toolbar and to make sure that the toolbar is updated UIUpdateToolBar() is called.
The other place where the UI elements are changed are within the view handlers. When you clear the controls there is no data and so the toolbar buttons and menu items for saving and clearing the data should be disabled. Similarly, when new data is received from one of the worker threads this will mean that there will be data in the controls which can be saved or cleared, so the menu items and tool bar buttons should be enabled. However, the UI update map is in the main frame, so the view does not have access to the UI update code.
To remedy this I have changed the view class to have a constructor with a CUpdateUIBase* parameter. The main frame class passes its this pointer to the view's constructor when the object is created:
CMainFrame() : m_view(this) {}
The view constructor caches this pointer so that when the view does something to change the UI it can tell the main frame, for example the Clear All handler calls this:
m_pParent->UIEnable(ID_FILE_SAVERESULTS, FALSE);
m_pParent->UIEnable(ID_VIEW_CLEARALL, FALSE);
To update the status bar panes I access it directly rather than putting it in the UI update map. Because the status bar has multiple panes I use a CMultiPaneStatusBarCtrl control, this is a data member of the main frame class, so I send a private message WM_UPDATESB from the view to the main frame to indicate that the main frame should update the status bar. This message passes a string as the WPARAM parameter which the main frame will use as the text for the first pane.
Other Methods
Both the main frame and view have other methods to do things like specify the minimum size of the view and to resize the controls when the view is resized. The view also has code to save the results to a file, and to load saved data. This code uses a class called CBucketFile that allows a 'bucket' of data to be saved to a file as ASCII text. Each process that generates debug messages will have a CBucket object that contains all the messages. This object is created on the heap and is stored as item data for each tree view item. When you select an item in the tree view the handler accesses the bucket for the item and initializes the list view with the messages in the bucket. If the data was stored from a debug event thread (ie the process is attached) then the item data also has the name of the process and so this is put in the static control. If the data came from the output stream monitoring thread then the process name is not available, so the PID is shown instead.
Creating the Sample
If you want to create this example yourself you need to perform these steps to create the basic application code
- Create a WTL application and on Step 1 make sure that SDI Application is selected
- Move to Step 2 and ensure that the "Use a view window" is selected., from the "View type" select "Form (Dialog based)"
- Open resource view and click on the dialog resource (probably called IDD_DEBUG_INFO_FORM). Remove the static control from the dialog template and add a tree view called IDC_TREEDATA, a static control called IDC_PROCESSPATH and a list box called IDC_MSGS. The positions and sizes of these controls are unimportant except in two respects. The code preserves the width of the tree view width whenever the window is resized, and it preserves the static control's height. Use the following table to determine which options to change from the default.
- You will need to change the menu and then the toolbar to reflect the items that they give access to. Changing the toolbar is a bit messy: start by opening the RC file as a text file (you'll get a dialog saying that doing this will stop the resource editor), then find the toolbar description and replace the IDs with those of the menu items that your buttons will be associated with. Close the RC file and open the toolbar bitmap as a bitmap – to do this you have to select it using the File|Open dialog rather then the bitmap resource in the resource view – now edit the button bitmaps, but make sure that you resize it to have exactly the same number of 16x15 images as you have buttons.
|
Control |
Options |
|
Styles: has lines, lines at root |
|
Styles: sunken |
|
Styles: selection none, uncheck sort, horizontal scroll |
|
Extended Styles: uncheck client edge |
This creates the basic project, and after this you can add the handlers and other methods.
Final Remarks
As you can see, WTL is a fully featured library that you can use to create Win32 GUI applications. Just about everything that you want a library to do, and more, can be done with WTL. I recommend it to you if you want to write GUI applications without the bulk of libraries like MFC.
Acknowledgements
I would like to thank Nenad for his help while I was learning WTL and for his contributions to the library.
What do you think of this article?
You can also write a review. We will publish the best ones here on this article. Send your review to [email protected].
Mail a question to the author!!
As part of the IDevResource commitment to Open Publishing, all of our authors are available to answer all of your trickiest questions at Author Central. For information about the authors, or to mail a question, visit them at Author Central.
Want to read more articles by this author?
Try these:
Byte size articles:
ATL Server By Richard Grimes, 220200
Richard's report from European Devweek 2000, and VCDC Bonn 2000 gives an insight into the new ATL Server technology.
Go To Article.
COM and Apartments By Richard Grimes, January 7th 2000
A discussion on the creation and use of "Apartments" in Win32.
Go To Article.
An Introduction to WTL By Richard Grimes, January 7th 2000
Richard gives a basic introduction to WTL.
Go To Article.
An Introduction to Interface Programming By Richard Grimes, January 7th 2000
Richard describes the background to interfaces.
Go To Article.
Full size articles:
What is Async COM? By Richard Grimes.
Go To Article
Microsoft Transaction Server By Richard Grimes, December 9th 1999
Introduces Microsoft Transaction Server
Go To Article.
What COM is all about By Richard Grimes, December 6th 1999
An introductory article to COM, covering all basics including OLE, Activex and DLL's.
Go To Article.
More COM Library articles:
![]() CAtlBitmapButton - ATL/WTL Ownerdraw Superclassed Bitmap Button By Amit Dey.
CAtlBitmapButton - ATL/WTL Ownerdraw Superclassed Bitmap Button By Amit Dey.
Amit describes building a simple user interface consisting of a series of bitmap buttons in a dialog.
Author: Amit Dey
Date Submitted: June 8 2001
![]() ATL COM and ADO By Paddy Srinivas.
ATL COM and ADO By Paddy Srinivas.
COM+ Events addresses many shortcomings of Connection points. Paddy Srinivas walks us through the COM+ Events System.
Author: Paddy Srinivas
Date Submitted: March 7 2001
![]() ATL COM and ADO By Amit Dey.
ATL COM and ADO By Amit Dey.
New author Amit Dey (he's looking for a job BTW ;-) ) explains his recent experiences with ATL COM and ADO. He simply explains the fundamentals of ADO and then runs through some ATL code examples in his application.
Author: Amit Dey
Date Submitted: March 6 2001
![]() COM Singletons: A Dangerous Animal By Richard Blewett.
COM Singletons: A Dangerous Animal By Richard Blewett.
Richard Blewitt simply explains the use of COM Singletons.
Author: Richard Blewett
Date Submitted: January 24 2001
ASP COM Objects By Jan Verhoeven.
Creating ASP com objects, or Active Server Objects with Delphi 5 is very easy, once you know how to do it.
Author: Jan Verhoeven
Date Submitted: November 1 2000
SafeArrays - For the Beginner By A. Abdul Azeez.
This article is a primer to Safe Arrays and can be used by any beginner to Safe Arrays.
Author: A. Abdul Azeez
Date Submitted: November 1 2000
![]() COM+ Basics - Creating your first COM+ Application By Martin Lapierre.
COM+ Basics - Creating your first COM+ Application By Martin Lapierre.
Author: Martin Lapierre
Date Submitted: June 1 2000
![]() COM+ - the backbone of Windows DNA By Mahesh Bhide.
COM+ - the backbone of Windows DNA By Mahesh Bhide.
Author: Mahesh Bhide
Date Submitted: June 1 2000
Exploring COM Threading and Apartments By Anthony Toivonen.
Anthony Toivonen wants you to figure it out for yourself: he guarantees success in threads and apartments after reading this article.
Author: Anthony Toivonen
Date Submitted: May 17th 2000
COM on Linux By Frank Rem.
A description of how to code a DCOM client for Linux without using Microsoft products.
Author: Frank Rem
Date Submitted: May 17th 2000
ATL Server By Richard Grimes.
A description of ATL Server.
Author: Richard Grimes
Date Submitted: May 9th 2000
ATL Internals - Part 2 By Shivesh Viswanathan.
Following on from Shivesh's first article of this two part series, this article covers the details of the internals of ATL.
Author: Shivesh Viswanathan
Date Submitted: May 3rd 2000
How to use DDX with WTL By Girish Bharadwaj.
Author: Girish Bharadwaj
Date Submitted: March 27th 2000
COM Patterns By Tony Toivonen.
Author: Tony Toivonen
Date Submitted: March 27th 2000
![]() COM+ Object Pooling By Jeremiah Talkar.
COM+ Object Pooling By Jeremiah Talkar.
Author: Jeremiah Talkar
Date Submitted: March 23rd 2000
What are COM Pipes? By Richard Grimes.
Author: Richard Grimes
Date Submitted: March 23rd 2000
Java COM Integration - Use Visual J++ to implement COM Objects By Gopalan Suresh Raj.
Author: Gopalan Suresh Raj
Date Submitted: March 9th 2000
Developing an MSMQ Server Application using VJ++ By Gopalan Suresh Raj.
Author: Gopalan Suresh Raj
Date Submitted: March 9th 2000
Developing an MSMQ Client using VJ++ By Gopalan Suresh Raj.
Author: Gopalan Suresh Raj
Date Submitted: March 9th 2000
![]() What is Async COM? By Richard Grimes.
What is Async COM? By Richard Grimes.
Author: Richard Grimes
Date Submitted: March 8th 2000
Coding a DCOM Server Component from IDL By Gopalan Suresh Raj.
Author: Gopalan Suresh Raj
Date Submitted: February 10th 2000
Level of Difficulty: Advanced
Subjects Covered: IDL, DCOM, J++
Pre-required Reading: Component Object Model
Coding a DCOM Client By Gopalan Suresh Raj.
Author: Gopalan Suresh Raj
Date Submitted: February 10th 2000
Level of Difficulty: Advanced
Subjects Covered: IDL, DCOM, J++
Pre-required Reading: Component Object Model, Coding a DCOM Server Component from IDL
Threads and Apartments By Brad Wilson.
Brad's article gives detailed information about apartments and their relationship to threading and synchronization. The goal is to demystify what is a very important, yet under-documented system in COM.
Author: Brad Wilson
Date Submitted: Feb 04 2000
Level of Difficulty: Intermediate
Subjects Covered: Single Threaded Apartments, Multi Threaded Apartments, Apartments.
Pre-required Reading:
WTL Architecture By Richard Grimes.
This article covers the basics of the WTL architecture, it describes the types of applications that you can create and how WTL manages threads. The example monitors the debug stream and uses WTL to present this data.
Author: Richard Grimes
Date Submitted: Feb 02 2000
Level of Difficulty: Intermediate
Subjects Covered: WTL applications architecture, WTL UI update, OutputDebugString and debugging API
Pre-required Reading: assumes a knowledge of ATL and of Win32 application development (for example "Professional ATL COM Programming", Richard Grimes, Wrox Press)
The MTS Series by Gopalan Suresh Raj:
Microsoft Transaction Server By Gopalan Suresh Raj.
Gopalans introductory article on Microsoft Transaction Server introduces the basics to MTS, and leads in to the example articles included in the series.
Author: Gopalan Suresh Raj
Date Submitted: Jan 26 2000
Level of Difficulty: Beginners / Intermediate
Subjects Covered: MTS
Pre-required Reading: None
Developing a Simple MTS Server Component By Gopalan Suresh Raj.
Part 1 of a two part example.
Author: Gopalan Suresh Raj
Date Submitted: Jan 26 2000
Level of Difficulty: Beginners / Intermediate
Subjects Covered: MTS
Pre-required Reading: Microsoft Transaction Server
Developing a Simple MTS Client Application By Gopalan Suresh Raj.
Part 2 of a two part example.
Author: Gopalan Suresh Raj
Date Submitted: Jan 26 2000
Level of Difficulty: Beginners / Intermediate
Subjects Covered: MTS
Pre-required Reading: Microsoft Transaction Server, Developing a Simple MTS Server Component
Developing The Bank Account IDL By Gopalan Suresh Raj.
A Three-Tier Architecture for a Bank Checking Account - Developing The Bank Account IDL is part 1 of a 3 part example.
Author: Gopalan Suresh Raj
Date Submitted: Jan 26 2000
Level of Difficulty: Beginners / Intermediate
Subjects Covered: MTS
Pre-required Reading: Microsoft Transaction Server
MTS Server Component By Gopalan Suresh Raj.
A Three-Tier Architecture for a Bank Checking Account - MTS Server Component is the second part of this three part example.
Author: Gopalan Suresh Raj
Date Submitted: Jan 26 2000
Level of Difficulty: Beginners / Intermediate
Subjects Covered: MTS
Pre-required Reading: Microsoft Transaction Server, Developing The Bank Account IDL
MTS Client By Gopalan Suresh Raj.
A Three-Tier Architecture for a Bank Checking Account - MTS Server Component is the third part of this three part example.
Author: Gopalan Suresh Raj
Date Submitted: Jan 26 2000
Level of Difficulty: Beginners / Intermediate
Subjects Covered: MTS
Pre-required Reading: Microsoft Transaction Server, Developing The Bank Account IDL, MTS Server Component
Other Articles
Active Template Library: Architecture & Internals By Shivesh Viswanathan.
Active Template Library is basically a set of template classes provided by Microsoft for writing COM components. The time to write COM components can be considerably reduced if they are written using the ATL framework. The document here provides theory of what goes inside ATL to implement certain generic interfaces.
Author: Shivesh Viswanathan
Date Submitted: Jan 21 2000
Level of Difficulty: Beginners / Intermediate
Subjects Covered: ATL
Pre-required Reading: None
Microsoft Transaction Server By Richard Grimes.
Introduces Microsoft Transaction Server
Author: Richard Grimes
Date Submitted: Dec 09 1999
Level of Difficulty: Beginners
Subjects Covered: MTS, VB
Pre-required Reading: None
What COM is all about By Richard Grimes.
An introductory article to COM, covering all basics including OLE, Activex and DLL's.
Level of difficulty: Beginner
Subjects Covered: COM
Pre-required reading: None
String Binding Moniker By Frank Rem.
This article shows how a SB Moniker resolves a connection with a DCE RP server running on Linux using a VB client.
Level of difficulty: Intermediate
Languages covered: COM
Pre-required reading: None
Author: Richard Grimes
Richard Grimes started programming aeons ago on 8-bit computers and hasn't looked back since. He has spent an interesting time as a research scientist (the little known "Grimes Effect" is his creation), underpaid time as a computer trainer and done time as a distributed object developer.
ATL took hold of Richard while he was part of a team developing a COM-based workflow system and its elegance and simplicity has had a lasting effect on him. Although his is not an obsessively pure COM existence, he finds that an ATL-assisted COM lifestyle gives him more time to enjoy his garden.
Go to Richards pages in Author Central.

Contribute to IDR:
To contribute an article to IDR, a click here.
To contact us at IDevResource.com, use our feedback form, or email us. To comment on the site contact our webmaster. |
All content © Copyright 2000 IDevResource.com, Disclaimer notice |