|


The Developer's Resource & Community Site
|
Developing A Simple MTS Server Component
Author: Gopalan Suresh Raj
Date Submitted: January 26th 2000
Level of Difficulty: Advanced
Subjects Covered: Microsoft Transaction Server
Pre-required Reading: Microsoft Transaction Server, Developing a Simple MTS Server Component
The source code for this example is available as a zip file for download here.
To work with any of these samples you will need the following:
- Microsoft Visual J++ ver 6.0
- Windows NT 4.0 Options Pack
The ClickClient counts and displays the number of times the User clicks on the "Click Here..." button during the lifetime of this client app. It uses the ClickServer to increment the count (Looks like our ClickClient client program is mathematically challenged :-) !!!!!!!!).

Shows the ClickClient MTS client program in action
The Steps involved in developing the MTS Client are
- Create a new Windows Application
Create a Windows Application project in Visual J++ by selecting the New Project in the File menu, then choosing the Windows Application project template. Name the project ClickClient and choose Open.
- Add COM Wrappers for the ClickServer Java MTS Component
Set up COM access to the Java Client App by adding COM wrappers to the server component. From the Project menu, select Add COM wrapper. Select the checkbox next to the ClickServer in the list of installed COM components in the COM Wrappers dialog and press OK. You will notice a package called ClickServer added to the ClickClient project. Alternatively, if the ClickServer does not show up on the list of registered COM wrappers, you always have the option of browsing and selecting the DLL manually.
- Add code in the ClickClient to call the ClickServer Java MTS component
This is where we add code to the Client apps form to interact with the Java MTS ClickServer component. Create a form similar to the one shown.
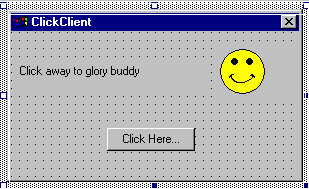
Shows the form that we need to develop for our ClickClient program
Now add code to the generated source. The code that needs to be added is highlighted in blue in the figure below. Specifically, we need code to import the ClickServer package
import clickserver.*;
Add a member to cache the Click Count on the client side
int clickCount = 0;
Add code to the button1_click method so that the server is invoked from the client whenever the button is pressed
 private void button1_click(Object source, Event e)   {
  ClickServer_Dispatch server = (ClickServer_Dispatch)new ClickServer();
  clickCount = server.Increment(clickCount);
  String clickDisplay = "That was click "+clickCount+ " buddy...";
  label1.setText(clickDisplay);
 }
The completed code is shown below:
| Form1.java |
import com.ms.wfc.app.*;
import com.ms.wfc.core.*;
import com.ms.wfc.ui.*;
import com.ms.wfc.html.*;
import
clickserver.*; /**
* This class can take a variable number of
parameters on the command
* line. Program execution begins with the main()
method. The class
* constructor is not invoked unless an object of
type 'Form1' is
* created in the main() method.
*/
public
class Form1 extends Form {
int
clickCount = 0;
public Form1() {
// Required for Visual J++ Form Designer support
initForm();
// TODO: Add any constructor code after initForm call
}
/**
* Form1 overrides dispose so it can clean up the
* component list.
*/
public
void dispose() {
super.dispose();
components.dispose();
}
private
void button1_click(Object source, Event e) {
ClickServer_Dispatch server =
(ClickServer_Dispatch)new ClickServer();
clickCount = server.Increment(clickCount);
String clickDisplay = "That was click
"+clickCount+ " buddy...";
label1.setText(clickDisplay);
}
/**
* NOTE: The following code is required by the
Visual J++ form
* designer. It can be modified using the
form editor. Do not
* modify it using the code editor.
*/
Container
components = new Container();
Label label1 = new Label();
Button button1 = new Button();
PictureBox pictureBox1 = new PictureBox();
private
void initForm() {
// NOTE: This form is storing resource
information in an
// external file. Do not modify the string
parameter to any
// resources.getObject() function call. For
example, do not
// modify "foo1_location" in the
following line of code
// even if the name of the Foo object
changes:
//
foo1.setLocation((Point)resources.getObject("foo1_location"));
IResourceManager resources = new ResourceManager(this,
"Form1");
this.setText("ClickClient");
this.setAutoScaleBaseSize(new Point(5, 13));
this.setClientSize(new Point(288, 146));
this.setMaximizeBox(false);
this.setMinimizeBox(false);
label1.setLocation(new Point(8, 32));
label1.setSize(new Point(192, 32));
label1.setTabIndex(0);
label1.setTabStop(false);
label1.setText("Click away to glory
buddy");
button1.setLocation(new Point(96, 96));
button1.setSize(new Point(88, 23));
button1.setTabIndex(1);
button1.setText("Click Here...");
button1.addOnClick(new
EventHandler(this.button1_click));
pictureBox1.setLocation(new Point(208, 16));
pictureBox1.setSize(new Point(100, 50));
pictureBox1.setTabIndex(2);
pictureBox1.setTabStop(false);
pictureBox1.setText("pictureBox1");
pictureBox1.setImage((Bitmap)resources.getObject("pictureBox1_image"));
this.setNewControls(new Control[] {
pictureBox1,
button1,
label1});
}
/**
* The main entry point for the application.
*
* @param args Array of parameters passed to the
application
* via the command line.
*/
public
static void main(String args[]) {
Application.run(new Form1());
}
}
|
Build and Run the Client program - ClickClient
Build the project by selecting Build from the Build menu. This creates a Windows executable with all the class files needed to execute the client including the COM wrappers for the server - packaged into one executable. Run it and have fun...
Previous Page....Developing a simple MTS Server Component
What do you think of this article?
Have your say about the article. You can make your point about the article by mailing [email protected] (If you haven't allready joined, you can join by going to https://www.onelist.com/community/dev-java).
You can also write a review. We will publish the best ones here on this article. Send your review to [email protected]. Please include the title of the article you are reviewing.
Further Reading
The MTS Series by Gopalan Suresh Raj:
Microsoft Transaction Server By Gopalan Suresh Raj.
Gopalans introductory article on Microsoft Transaction Server intorduces the basics to MTS, and leads in to the example articles included in the series.
Author: Gopalan Suresh Raj
Date Submitted: Jan 26 2000
Level of Difficulty: Beginners / Intermediate
Subjects Covered: MTS
Pre-required Reading: None
Developing a Simple MTS Server Component By Gopalan Suresh Raj.
Part 1 of a two part example.
Author: Gopalan Suresh Raj
Date Submitted: Jan 26 2000
Level of Difficulty: Beginners / Intermediate
Subjects Covered: MTS
Pre-required Reading: Microsoft Transaction Server
Developing The Bank Account IDL By Gopalan Suresh Raj.
A Three-Tier Architecture for a Bank Checking Account - Developing The Bank Account IDL is part 1 of a 3 part example.
Author: Gopalan Suresh Raj
Date Submitted: Jan 26 2000
Level of Difficulty: Beginners / Intermediate
Subjects Covered: MTS
Pre-required Reading: Microsoft Transaction Server
MTS Server Component By Gopalan Suresh Raj.
A Three-Tier Architecture for a Bank Checking Account - MTS Server Component is the second part of this three part example.
Author: Gopalan Suresh Raj
Date Submitted: Jan 26 2000
Level of Difficulty: Beginners / Intermediate
Subjects Covered: MTS
Pre-required Reading: Microsoft Transaction Server, Developing The Bank Account IDL
MTS Client By Gopalan Suresh Raj.
A Three-Tier Architecture for a Bank Checking Account - MTS Server Component is the third part of this three part example.
Author: Gopalan Suresh Raj
Date Submitted: Jan 26 2000
Level of Difficulty: Beginners / Intermediate
Subjects Covered: MTS
Pre-required Reading: Microsoft Transaction Server, Developing The Bank Account IDL, MTS Server Component
Author: Gopalan Suresh Raj
You can meet Gopalan, and the other iDevResource authors in Author Central. Gopalan also maintains his own site at http://www.execpc.com/~gopalan/.
Contributors to iDevResource.com get their own site at Author Central. Why not write an article and become a member of the iDevResource community.
© Copyright 1997-2000 Gopalan Suresh Raj. Reproduced with Permission
|