
|

Java Foundation Classes in a Nutshell: Swing Programming Topics Reproduced with kind permision of O'Reilly & Associates: www.oreilly.com
Contents: The last chapter provided an architectural overview of AWT and Swing; it explained how to create a graphical user interface by placing components inside containers, arranging them with layout managers, and handling the events that they generate. This chapter builds on that architectural foundation and introduces many other important features of Swing. Most of the topics discussed herein are independent of one another, so you can think of each section as a short essay on a particular topic, where the sections can be read in any order. This chapter introduces many of the new components and features of Swing, but it cannot cover them in full detail. For more information on the topics covered herein, see Java Swing, by Robert Eckstein, Marc Loy, and Dave Wood (O'Reilly). 3.1 Versions of Swing Swing is a core part of the Java 2 platform, so many developers will simply obtain the Swing libraries when they download the Java 2 SDK. Swing is also available as a separate download for use as an extension to Java 1.1. When you download Swing independently of the SDK, you must pay attention to the Swing version number. Swing 1.0.3 is an early version of Swing that was released before Version 1.2 of Java 2. It is now outdated and is not documented in this book. Swing 1.1 is the version of Swing that is being bundled with Java 1.2. You can download a version of it for use with Java 1.1 from https://java.sun.com/products/jfc/. As this book goes to press, the most recent version of Swing is Swing 1.1.1. This version of Swing is bundled with Java 1.2.2 and is also available for use with Java 1.1 from the web site mentioned in the previous paragraph. Swing 1.1.1 fixes many bugs in the initial release of Swing 1.1 but does not change the Swing 1.1 API in any way. Its use is strongly recommended. Swing 1.1.1 is the last release of Swing that will be available for use with Java 1.1. Development of Swing continues, and Java 1.3 will ship with a new version that includes a number of minor changes and improvements to the Swing API. This future release will focus on improving the existing APIs and should not add many new APIs. 3.2 Labels and HTML In the initial releases of Swing 1.1 and Java 1.2, the JLabel, JButton, and related classes that display textual labels can display only a single line of text using a single font. In Swing 1.1.1 and Java 1.2.2, however, components like these can display multiline, multifont text using simple HTML formatting. To display formatted text, simply specify a string of HTML text that begins with an <HTML> tag. You can use this feature to present text using multiple fonts, font styles, and colors. Just as important, however, the introduction of HTML allows you to specify multiline labels. This new formatted text display feature is available in Java 1.2.2 for the JLabel, JButton, MenuItem, JMenu, JCheckBoxMenuItem, JRadioButtonMenuItem, JTabbedPane, and JToolTip classes. It is not supported (at least in Java 1.2.2) by JCheckBox or JRadioButton, however. Formatted text display is particularly useful with JOptionPane dialog boxes (described later in this chapter), as they display text using internal JLabel objects. 3.3 Actions A GUI application often allows a user to invoke an operation in a number of different ways. For example, the user may be able to save a file by either selecting an item from a menu or clicking on a button in a toolbar. The resulting operation is exactly the same; it is simply presented to the user through two different interfaces. Swing defines a simple but powerful javax.swing.Action interface that encapsulates information about such an operation. The Action interface extends the ActionListener interface, so it contains the actionPerformed() method. It is this method that you implement to actually perform the desired action. Each Action object also has an arbitrary set of name/value pairs that provide additional information about the action. The values typically include: a short string of text that names the operation, an image that can be used to represent the action graphically, and a longer string of text suitable for use in a tooltip for the action. In addition, each Action object has an enabled property and a setEnabled() method that allows it to be enabled and disabled. (If there is no text selected in a text editor, for example, the "Cut" action is usually disabled.) You can add an Action object directly to a JMenu or JToolBar component. When you do this, the component automatically creates a JMenuItem or JButton to represent the action, making the action's operation available to the user and displaying the action's textual description and graphical image as appropriate. When an action is disabled, the JMenuItem or JButton component that represents the action displays it in a grayed-out style and does not allow it to be selected or invoked. One shortcoming of working with actions is that there is no way to tell a JMenuBar or JToolBar to display just text or just icons for actions. Although you might like an action's name to be displayed in a menu and its icon to be displayed in a toolbar, both JMenuBar and JToolBar display an action's textual name and its icon. The Action interface helps you implement a clean separation between GUI code and application logic. Remember, however, that you cannot just instantiate Action objects directly. Since Action is a kind of ActionListener, you must define an individual subclass of Action that implements the actionPerformed() method for each of your desired actions. The AbstractAction class is helpful here; it implements everything except the actionPerformed() method. 3.4 Tooltips A Swing component can display context-sensitive help to the user in the form of a tooltip: a small window that pops up when the user lets the mouse rest over the component. You can display text in this window that explains the purpose or function of the component. Specify this text with the setToolTipText() method. This toolTipText property is inherited from JComponent, so it is shared by all Swing components. While it is a good idea to provide tooltips for the benefit of your novice users, your experienced users may find them annoying, so it is nice to provide a way to turn them off. You can do this programatically by setting the enabled property of the ToolTipManager object. The code looks like this: ToolTipManager.sharedInstance().setEnabled(false); 3.5 Timers The javax.swing.Timer object generates single or multiple ActionEvent events at time intervals that you specify. Thus, a Timer is useful for performing a repeated operation like an animation. They are also useful for triggering operations that must occur at some point in the future. For example, an application might display a message in a status line and then set up a Timer object that erases the message after 5,000 milliseconds. These operations can also be performed with threads, of course, but since Swing is not designed for thread safety, it is usually more convenient to use a Timer. You use Timer objects just like regular components. A Timer has property accessor methods and an addActionListener() method that you can use to add event listeners. The initialDelay property specifies how many milliseconds the Timer waits before firing its first ActionEvent. If the repeats property is true, the Timer generates a new ActionEvent each time delay milliseconds passes. When an application (or the system in general) is very busy or when the delay property is very small, the timer may fire events faster than the application can process them. If the coalesce property is true, the Timer combines multiple pending events into a single ActionEvent, rather than letting a queue of unprocessed events build up. 3.6 The Event Dispatch Thread For efficiency reasons, Swing components are not designed to be thread safe. This means that Swing components should be manipulated by a single thread at a time. The easiest way to ensure this is to do all your GUI manipulations from the event dispatch thread. Every GUI application has an event dispatch thread: it is the thread that waits for events to occur and then dispatches those events to the appropriate event handlers. All of your event listener methods are invoked by the event dispatch thread, so any GUI manipulations you perform from an event listener are safe. There are times, however, when you need to update your UI in response to some kind of external event, such as a response from a server that arrives in a separate thread. To accommodate these situations, Swing provides two utility methods that allow you ask the event dispatch thread to run arbitrary code. The methods are SwingUtilities.invokeLater() and SwingUtilities.invokeAndWait(). You pass a Runnable object to each method, and the run() method of this object is invoked from the event thread. invokeLater() returns right away, regardless of when the run() method is invoked, while invokeAndWait() does not return until the run() method has completed. The invokeLater() and invokeAndWait() methods do not run your Runnable object right away. Instead, each method encapsulates the Runnable object within a special event object and places the event on the event queue. Then, when all pending events have been handled, the Runnable object is extracted from the event queue and the event dispatch thread calls its run() method. This means that invokeLater() provides a useful way to defer the execution of some chunk of code until after all pending events have been processed. There are times when you may even want to do this with code that is already running within the event dispatch thread. 3.7 Client Properties In addition to its normal set of properties, JComponent includes a hashtable in which it can store arbitrary name/value pairs. These name/value pairs are called client properties, and they can be set and queried with the putClientProperty() and getClientProperty() methods. Since these are JComponent methods, they are inherited by all Swing components. Although both the name and value of a client property can be arbitrary objects, the name is usually a String object. Client properties allow arbitrary data to be associated with any Swing component. This can be useful in a number of situations. For example, suppose you've created a JMenu that contains 10 JMenuItem components. Each component notifies the same ActionListener object when it is invoked. This action listener has to decide which of the 10 menu items invoked it and then perform whatever action is appropriate for that menu item. One way the action listener can distinguish among the menu items is by looking at the text that each displays. But this approach doesn't work well if you plan to translate your menu system into other languages. A better approach is to use the setActionCommand() method (inherited from AbstractButton) to associate a string with each of the JMenuItem components. Then the action listener can use this string to distinguish among the various menu items. But what if the action listener needs to check some kind of object other than a String in order to decide how to process the action event? Client properties are the solution: they allow you to associate an arbitrary object (or multiple objects) with each JMenuItem. Client properties are used within Swing to set properties that are specific to a single look-and-feel implementation. For example, the default Java look-and-feel examines the client properties of a few components to obtain additional information about how it should display the components. Here are some details on these particular client properties:
3.8 Keyboard Shortcuts A full-featured user interface does not require the user to use the mouse all the time. Instead, it provides keyboard shortcuts that allow the user to operate the application primarily or entirely with the keyboard. Swing has a number of features that support keyboard shortcuts. Every Swing component is designed to respond to keyboard events and support keyboard operation automatically. For example, a JButton is activated when it receives a KeyEvent that tells it that the user pressed the Spacebar or the Enter key. Similarly, JMenu and JList respond to the arrow keys. 3.8.1 Focus Management In order for a Swing component to receive keyboard events, it must first have the keyboard focus. In the old days, before graphical interfaces, when you typed on the keyboard, the characters always appeared on the screen. There was only one "window," so there was only one place to send key events. This changes with the introduction of windowing systems and GUIs, however, as there are now lots of places that keyboard events can be directed to. When there is more than one window open on the screen, one window is singled out as the current window (or the focused window). Most windowing systems highlight this window somehow. When you type at the keyboard, it is understood that your keystrokes are directed at the current window. Just as a screen may contain many application windows, a single application window usually contains many GUI components. An application window must redirect the keyboard events it receives to only one of these components, called the focused component. Like most GUI toolkits, Swing highlights the component that has the keyboard focus, to let the user know where keyboard events are being directed. The details of the highlight depend on the look-and-feel that is currently in effect, but focus is often indicated by drawing a bold border around a component. A Swing component can be operated from the keyboard when it has the focus. The user can usually direct keyboard focus to a given component by clicking on that component with the mouse, but this defeats the whole point of not using the mouse. The missing piece of the picture is focus traversal, otherwise known as keyboard navigation, which allows the user to use the keyboard to change focus from one component to the next. Swing uses the Tab key to implement focus traversal. When the user presses Tab, Swing moves the keyboard focus from the current component to the next component that can accept the focus. (Some components, such as JLabel objects, do not respond to keyboard events and are therefore never given the focus.) When the user types Shift-Tab, Swing moves keyboard focus backward to the previous focusable component. By default, keyboard focus moves from left to right and top to bottom within a container. You can override this, however, by setting the nextFocusableComponent property of your components, chaining them together in whatever order you desire. When a container is given focus through this mechanism, it passes that focus on to its first focusable child. When the focus reaches the last focusable child, some containers relinquish the focus and allow it to move on, while other containers retain the focus and give it back to the first focusable child. You can determine the behavior of a container by calling isFocusCycleRoot(). If this method returns true, the container defines a focus cycle and retains the focus. The user must type Ctrl-Tab to traverse to the next focus cycle or Ctrl-Shift-Tab to traverse to the previous focus cycle. There is no setFocusCycleRoot() method: the only way you can change this behavior is by subclassing a container and overriding the isFocusCycleRoot() method. Also note that multiline text components such as JTextArea and JEditorPane use the Tab key for their own purposes. These components behave like focus cycles, so the user must type Ctrl-Tab to move the focus away from such a component. An application sometimes needs to set the keyboard focus to a particular component explicitly. You can do this by calling the requestFocus() method of that component. Components typically call requestFocus() themselves under certain circumstances, such as when they are clicked on. If you do not want a component to respond to requestFocus() calls, set its requestFocusEnabled property to false. For example, you might set this property on a JButton so that the user can click on it without taking keyboard focus away from whatever component currently has it. Swing focus management is handled by the currently installed javax.swing.FocusManager object. You can obtain this object with FocusManager.getCurrentFocusManager(). If you implement your own manager, you can install it with FocusManager.setCurrentFocusManager(). 3.8.2 Menu Mnemonics and Accelerators Although Swing components can all be operated automatically from the keyboard, doing so is often cumbersome. The solution is to provide additional explicit keyboard shortcuts for common actions, as is commonly done with items on pull-down menus. Swing pull-down menus support two traditional types of keyboard shortcuts: mnemonics and accelerators. Figure 3.1 shows both types of menu shortcuts. Figure 3.1: Swing menu mnemonics and accelerators 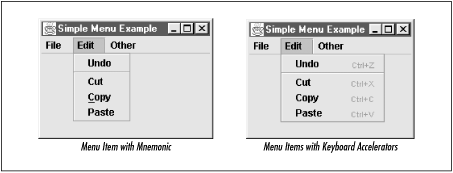 A menu mnemonic is a single-letter abbreviation for a menu command. When the menu has already been pulled down, the user can type this single key to invoke that menu item. The mnemonic for a menu item is typically indicated by underlining the letter of the shortcut in the menu item name, which means that you must select a shortcut letter that appears in the menu item label. Mnemonics must be unique within a menu, of course, but multiple menu panes can reuse mnemonics. Items in a menu bar may also have mnemonics. You specify a mnemonic for a menu or a menu item with the setMnemonic() method (inherited from AbstractButton):
JMenu file = new JMenu("File");
file.setMnemonic('F');
JMenuItem save = new JMenuItem("Save");
save.setMnemonic('S');            // Always use a capital letter
file.add(save);
A menu accelerator is a unique keyboard command that can be used to invoke a menu item even when the menu is not displayed. An accelerator is represented by a javax.swing.KeyStroke object and usually includes a keyboard modifier such as Ctrl or Alt. Unlike mnemonics, accelerators can be applied only to menu items, not to menus in a menu bar. You can create an accelerator for a menu item by calling setAccelerator(). To obtain an appropriate KeyStroke object, call the static KeyStroke.getKeyStroke() method with the keycode and modifier mask for the keyboard command you want to use:
JMenuItem save = new JMenuItem("Save");
save.setAccelerator(KeyStroke.getKeyStroke(java.awt.event.KeyEvent.VK_S,
                                           java.awt.Event.CTRL_MASK));
|